
Introduction to the Actions panel using Adobe Photoshop
There are many situations where we find ourselves doing repetitive tasks over and over with Adobe Photoshop wishing that there could be a quicker way. Well, that ‘quicker way’ is called the Actions panel!
Definition of an Action
An Action is a recording of a series of Commands applied to a file or folder using Adobe Photoshop. You can then play that recording back on a different file or folder and Photoshop will do the heavy lifting for you, repeating the exact steps that you had recorded while you go grab a coffee!
Sound good? Here’s a basic example, to better understand the Actions panel.
Example: Optimizing images for a website photo gallery – image size and resolution
Let’s say our image has a resolution of 300 pixels/inch and a height/width of 52.5cm/35cm. We want 72 pixels/inch and a height/width of 13.5cm/9cm.
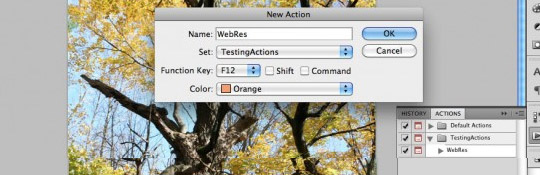
Step 1 At the bottom of the Actions panel, click the Create a New Set btn. Name the set TestingActions.

Step 2 Open a file. Any image file will do. Click Create a New Action btn at the bottom of the Actions panel. Name the action WebRes. Choose TestingActions as your set. Set the function key to F12 (this keyboard shortcut helps so you don’t have to go back into the Action panel every time you want an action). Choose a color to help you differ it from other actions. Finally, Click the Record btn.

Photoshop is now watching everything that you’re doing and storing that information.
Step 3 So, select Image Size from the Image menu. Set the resolution to 72 pixels/inch, uncheck the constrain proportions btn if necessary to change the width and height.

Step 4 Select Save As from the File menu and save it to the desktop, keep the File Type set to PSD. Leave everything else as is and click Save.
Step 5 Stop the recording by clicking the Stop Playing/Recording btn in the Actions panel. This Action will now save your graphics to your desktop with the same name you used while creating this action and we don’t want that, so let’s edit the action a bit.
Step 6 In the Action Panel to the left of the new TestingAction folder click the blank square beside the check-mark. This will turn the toggle on. This will pause the Action and allow you enter a new name or save it to a different location!

Well, there you have it. You have now been introduced to the Action panel, and that is just the beginning! So, keep experimenting and having fun, while improving your productivity!


About Author
I'm the curator here at designshifts.com as well as being a web developer by day. I have a passion for design and love to share inspiration and tips and tricks with the community.