WordPress Theme Building: Adding Coloured Content Boxes
I was recently asked by a client if there was an easy way for them to add coloured content boxes into a Pages or a Posts. The quick answer was yes, not a problem! Here is an example:
All you need to do was add a bit of CSS and then whenever they wanted to add a new content box they would just need to add div tag with an associative class like such:
<div class=”content-box-blue”>Enter content box text here.</div>
/* Content Boxes CSS

------------------------------------------------------------ */
.content-box-blue { margin: 0 0 25px; overflow: hidden; padding: 20px; }
.content-box-blue { background-color: #d8ecf7; border: 1px solid #afcde3; }
“…Yes, this works fine, but I don’t want to add the HTML every time I want to add a box?”
Good point. So this makes things a bit more complicated doesn’t it? But in the end I think the client was correct, that’s not how you want to spend your time, you want to put that extra effort into great content.
So here are the steps and solution I came up with so that your client doesn’t need to add the HTML:
1. You will still want to add the CSS to your theme or child theme style.css*:
.content-box-blue,
.content-box-gray,
.content-box-green,
.content-box-purple,
.content-box-red,
.content-box-yellow { margin: 0 0 25px; overflow: hidden; padding: 20px; }
.content-box-blue { background-color: #d8ecf7; border: 1px solid #afcde3; }
.content-box-gray { background-color: #e2e2e2; border: 1px solid #bdbdbd; }
.content-box-green { background-color: #d9edc2; border: 1px solid #b2ce96; }
.content-box-purple { background-color: #e2e2f9; border: 1px solid #bebde9; }
.content-box-red { background-color: #f9dbdb; border: 1px solid #e9b3b3; }
.content-box-yellow { background-color: #fef5c4; border: 1px solid #fadf98; }
*If you just want to add content boxes with good old CSS and the div tags click here
2. upload the plugin: Post Snippets
This is a useful little plugin that can help you build shortcodes for your Posts/Pages and works well in this case. Once you have upload and activated the Plugin go to your main menu > Settings > Post Snippets.
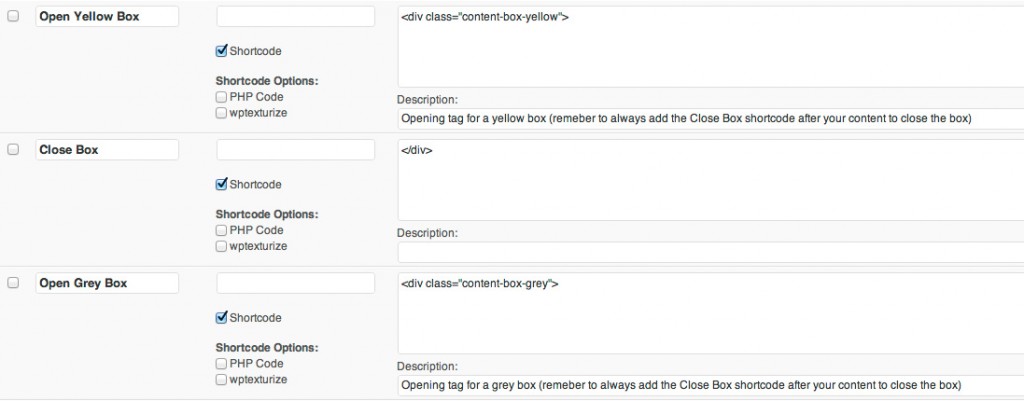
Now, to make this work you are going to add all the opening div tags of the colored boxes that you’d like. The next step will be to add the closing tag (you will only need to add one closing tag snippet and use it for all the different colors.)
Here is an example of the Snippets page with a couple opening tags as well as the closing tag (make sure to click the Shortcode button).

3. Create a new Page/Post
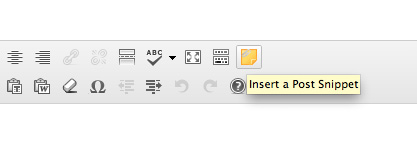
Now that we’ve added the CSS to our style.css, we’ve added the Snippets, now we can add the shortcodes to the post. When you create a new post you will see a new yellow button in the WYSIWYG text editor. Click this button.

You’ll see the snippets you created earler are all there. Click one, for example: Open Blue Box > Insert. This will add <div class=”content-box-blue”>. Now enter your box content….Finally go back and add > Close box snippet and this will add the closing div tag: </div>. Finally you end up with:
<div class=”content-box-blue”>Now enter your box content</div>
There you have it, you know have a way to create content boxes for your clients and they will not have to get their hands dirty!
Hope this has been useful. If you have anything to add leave me comment!


Hey what if i want to also define a box for heading above the box with color background also?