
Step by Step Instructions for Upgrading the Drupal Core within a major Release
It’s inevitable that eventually we will have to upgrading our Drupal core. But why should I you ask? I know it seems like a pain, but with a community based framework there are thousands of people working hard to make it better and safer. So when enough glitches and patches for problems are found then we need to upgrade. You don’t want to be left with a deprecated framework.
Available updates So, this is a bit of a process and really has to be done properly or you could have some problems for your website. First sign in with the main user for this account. Click Administer and you will see this red box with a blue link to available updates. Click this link to see what you need.


You will see that there is a Recommended version. So Click the Download button and save that version to the desktop of your computer, or somewhere safe. (Note: these are old images and not the current recommended versions, so you will see a more recent version!)

Backup Database and Site Folder Now we have to make sure we don’t lose anything import from our website, so the first thing that we are going to do is using your FTP client locate your site file and find UPGRADE.txt. These are the steps that we are going to follow.

Site Directory Download your “sites” directory which contains your configuration file, added modules and themes, and your site’s uploaded files to your computer. Just incase, it’s always good to have a back-up!
Now go into Site Maintenance mode so that the rest of the world doesn’t see a bunch of error messages. Go to Administer > Site Maintenance. Click on the Off-line button and Save configuration.

Theme If you’re using your own theme or a custom theme switch to a core theme, such as Garland or Bluemarine.

Modules Disable all custom and contributed modules. Administer > Modules and click off any module that you have added. (NOTE: You might want to take a screen shoot so that you remember which modules you where actually using.)

Now you can delete all the files and directories from your Drupal installation directory. Once you have nothing left in your website directory find your New files that you downloaded earlier and up load them to the site directory.
Site Folder Once your files have finished uploading replace the Site folder with the back up one that you save earlier.
Update.php Very Important! In your browser you need to run the update.php for your site to update the database of these changes to the Modules. So run www.example.com/update.php and follow these steps:
A. press continue.

B. Press Update.

C. Let the update run and if this all works like it should…

D. You should see all green checkmarks.

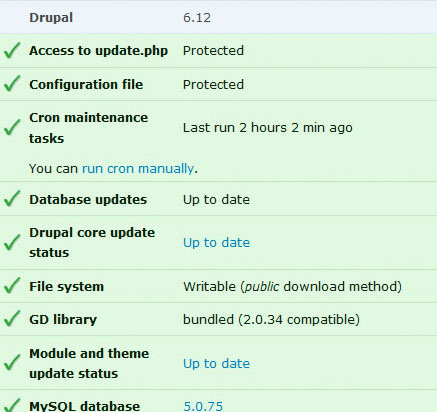
Next Click on the Administration pages link, scroll down and click the Statues Report button and you should see that you are now using the new version of drupal.

Modules enable all custom and modules. Administer > Modules. Once saved, to be safe run the update.php again.
Once you have run the Update.php again and if everything looks good you can go ahead and change your theme back to the one you where using.
Online mode Finally go to Administer > Site Maintenance. Click on the Online-mode button and Save configuration. This will set your website live to the users once again!
Congratulations! You have upgraded your Drupal core!


About Author
I'm the curator here at designshifts.com as well as being a web developer by day. I have a passion for design and love to share inspiration and tips and tricks with the community.