
One-Two Punch for Outdoor Photography – Part Two

Punch One
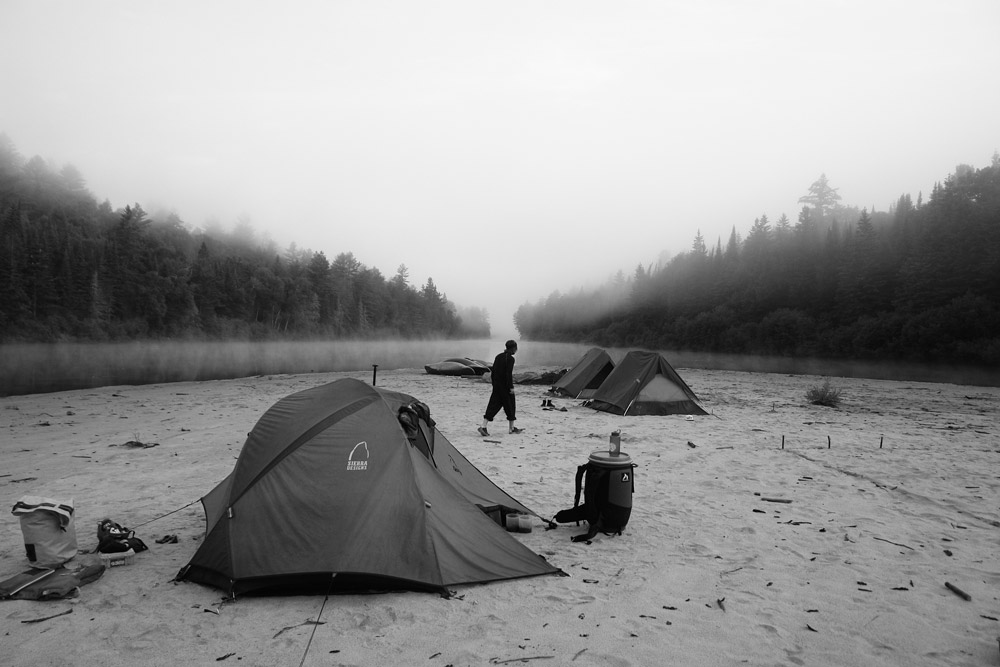
To deal with the first issue of contrast ratios, there are several remedies. One growing in popularity is the fine art of HDR photography, which I won’t get into here, save for the fact that if there is ANY movement in your frame over the course of your exposures (HDR uses multiple exposures of the same thing) then you can’t use this method. I like to take action shots, like the one pictured here, so photoHDR would have been out of the question for me. If I use Adobe Photoshop’s standard light/darkness settings, I’ll certainly bring out the skin tones in the legs of my subject here, but I would completely blow out the already dangerously close highlights in those clouds, so that’s not an option.
Instead I use a method called tone mapping, which is invoked in Adobe Photoshop CS4 by selecting Image> Adjustments> Highlights/Shadows. The effect is instantaneous. By compressing the contrast ratio of the photo into something displayable by my monitor (and my printer for that matter) the photo approximates much more closely what my eye would have seen, and that greatly enhances the aesthetic of the shot. The box presents multiple slider bars to bring out the shadows more or compress the highlights. The tonal width represents the range of tones you can influence with each bar. While on the topic, avoid the very kitsch halo effects that are brought about by too much compression of the highlights. This is all well and good, but in so doing I have exposed the ugly underbelly
  of the shadows in my shot: the noise.
I photograph at a low ISO setting whenever possible, which I was here, but if I had been working at 1600 or 3200 the photo might be borderline unusable, depending on my camera. If this photo were ever to be cropped, say for some twisted reason a web designer was interested only in the left leg of my subject  here, I might get into some trouble. See the noise here? Very troublesome.
Punch 2
Now Adobe Photoshop has noise correction built into it, but for such a broad based program the applications grow exponentially, and so in an admission of its own (completely inevitable) shortcomings, the programmers have allowed Adobe Photoshop to accept plugins that perform functions not originally programmed into the application itself. PictureCode is a company that has developed what is arguably the industry standard in noise reduction software, and that’s what I rely upon in many instances after balancing out the lights and shadows  in my images.
Once installed, just select Filter> PictureCode> NoiseNinja and the application opens. NoiseNinja is really in-depth and even contains a feature known as the “noise brush” that allows noise reduction only in select areas of the photo. Noise reduction works by a complex method of averaging out the information over a specified area to interpolate (best guess) what the image actually looked like versus what the image sensor recorded. Click on the filter tab and the strength, smoothness and contrast controls will control the basic features. When you’re done just click okay and the noise reduction will be applied. After this just using CTRL+F will apply the same settings to any open image in that session.
Summary
If you’re in a hurry, what I’ve presented here can be summed up very quickly:
Step 1
In Adobe Photoshop, Click Image> adjustments> shadows/highlights, adjust the sliders to your liking, avoid halos (unless you’re into that sort of thing, you know, whatever),
Step 2
Invoke NoiseNinja with Filters>PictureCode>NoiseNinja click the filter tab, adjust sliders to your liking, hit OK. Save image and enjoy a useable image. This works for about 80% of the pictures I take in the outdoors, and has changed the way I photograph. Now I don’t worry about photos being a bit on the dark side because I know the sky will then expose properly, leaving me to work out the details of the shadows later in Photoshop. If, however, I sacrificed the sky, well then I’ve lost the highlights to the blown out whites on the high end of the contrast range.
Marcus Brunmeier’s photos can be found in:
Flickr
Our kids Go to Camp magazine Photography contest 2005, 2007, second 2006, runner up 2008
Our Canada Magazine, 2008
OVC photo contest Winner in multiple categories 2007, 2008
Camp Kandalore Brochures
Our World Ontario Biodiversity Video Government of Ontario
BEAN (Biodiversity Education and Awareness Network) Slideshow, Government of Ontario


About Author
There is wilderness everywhere, true and urban, peopled and desolate, in cities and oceans. Both contain complexity and simplicity. When they appear balanced, or one masquerades as the other, that makes photography that appeals to me - that's what I try to do.
Man, perfect example of Highlights/Shadows in Photoshop. Heck, I didn’t even know it was called tone mapping. Hope it’s ok here but I think if you used the history brush (or a mask with the original layer below the modified one) to bring back the trees and water, that could really polish the image. Looks great though! Kudos.
Thanks for your comment Brian, I’ll mention it to Marcus!